4.29.2011

Viewfinder Pillow


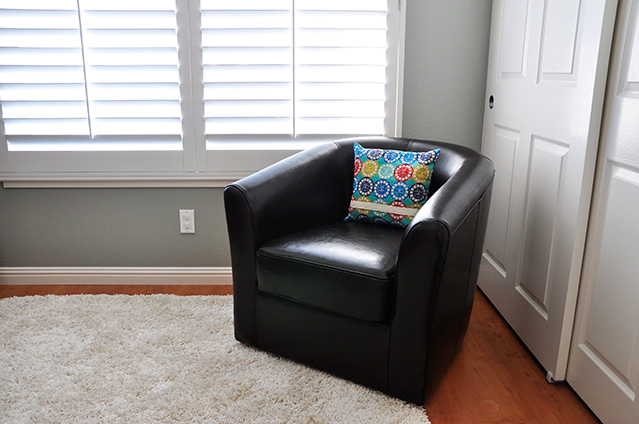
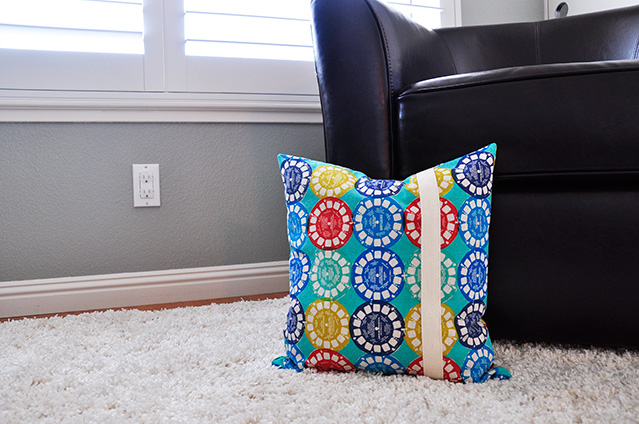
Well I am still working on decorating The Bubb's room and I have just finished the first pillow! Yeah! I have secretly been wanting some of this Viewfinder in Blue fabric from the Ruby Star Rising Collection by Kokka, so when Evan said he liked it when we were at Hart's fabric, I finally got to get some :)

I have had some pillow forms sitting around for a while and just haven't had the time to get started. But yesterday I had an hour or so to work on something for "us" so I decided to seize the moment. I selected the 14" square pillow form, really it turned out to be 14" x 15" and figured out how I was going to construct the pillow case. I was going to do a zipper, but then decided I wanted to try the overlap slot in the back instead. I cut the front to be 14.75" by 15.75" and then cut two pieces for the back, each measuring 15.75" and since I only had a half yard of fabric, I think it turned out to be about 8.5 inches the other way. (I didn't actually measure). So I fold over one edge of the 15.75" by 8.5" piece (I folded the 15.75" side) by about 3/8 of an inch and pressed it down. I did this to the second 15.75" by 8.5" piece too. Then I sewed  it down to create a hem so the fabric wouldn't fray.


For some additional interest I bought a piece of canvas strap (not sure the name) but it is found with all the fun ribbon/lace/piping/etc. that is cut by the yard at the store, to attach to one side of the pillow.


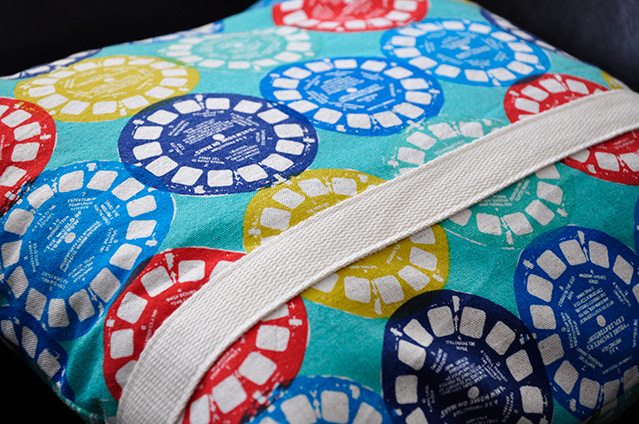
I positioned it on the large piece of fabric (the front) and sewed it down. From here I just pinned the three pieces together right sides facing. Then stitched all the way around, flipped, and was done. I put the pillow in to try it out and it amazingly fit. So excited!


4.27.2011

Quilt Story Feature

Remember this Chenille Cut Quilt I made a few months back?


And of course the original one


Well today it is being featured on Quilt Story! It was such an honor to get asked by Megan and Heather, the sister team behind the blog, to feature this blanket, as we all know I am not really a "quilter".


They have some fabulous giveaways on their blog and some truly amazing quilt ideas to share. So hop on over and take a peek. The original post can be found here.

4.26.2011

Rub a Dub Dub We Got a Bubb in the Tub


The Bubb has graduated from the kitchen sink into the bath tub at last. Not ever finding a perfect chair/sling for him to use in the tub we've been sort of putting off making the change, but a couple of weeks ago, once he really mastered sitting, we moved him to the tub. He seems to enjoy it.


4.23.2011

Peeps For Everyone


Seeing that tomorrow is Easter I decided that we needed to get some Peeps, you know those yummy marshmallow creatures. So when I was at Target this morning I got some. And guess what, you can't just buy a pack of 4 anymore they come in packs of like 20. Anyway I am getting off topic.


Look at how yellow and friendly they are!


And you just can't help but taste them.


After I got them home I decided that I needed to make something springy for The Bubb. I was originally thinking of doing some sort of banner/bunting for his room but then decided to just make a big yellow Peep. I briefly searched around and found a simple pattern on Made. I printed out the one she had and decided it wasn't big enough so I free handed around it to make it much larger on some yellow fleece I had left over from a changing pad.


I doubled over the fabric right sides facing and stitched on the outline that I drew. I then turned the peep right side out and stuffed in some polyfill. I then hotglued the button face on. Obviously if I had been thinking I would have sewed the buttons on BEFORE I stitched him together. Oh well. The Bubb was very interested in the button face but I am going to have to be really watchful so he doesn't get them off!


Since I am talking about candy I thought that I would share my absolute favorite. The See's Bordeaux Egg. Easter just isn't that same with out it.


Just blogging about it makes me want to have some but I will try very hard to wait for tomorrow :)

4.22.2011

Here's To Another 100,000 Miles

Well for those of you who are always curious about my car's mileage, she has now reached 100,000! We took her on her "senior" voyage to Santa Cruz last weekend. My little 4-cylinder 1994 car is still as peppy as it was when I first started driving her, but of course the years are starting to take a little toll! Here we are documenting the occasion:


Our first stop on our trip was to a fabric store, Harts Fabric. I had never been to this particular one and wanted to check it out. Although there store has a great selection I would not recommend them as they do not seem to take care of their materials (holes and stains). Its too bad as I prefer to buy locally.

Anyway we also went to the beach and let The Bubb put his feet in the water and he really didn't care for it, but then again I can't blame him as I didn't want to stand in it either!


We also played in the sand a bit.


And yes we may have tasted some of the sand:


But I think that we will be back as we enjoyed relaxing with the wind in our hair and sand on our feet.


4.16.2011

On the Move


The Bubb has decided that he needs to go places and he is! The things that motivate him most are cords, curtains, drinks, water bottles, magazines, plastic bags, baby wipe packages, the yellow jingle ball, and green frog. Of course his favorite will change from moment to moment. He gets very fixated on wanting to be somewhere and doesn't want anything to stand (or be placed) in his way. And here is a live action view of the little man. He can actually go any distance now if he wants to :)


4.13.2011

Goldfish Box


We received this box full of chocolate from family that went to Hawaii and let me tell you they were super yummy. It lasted maybe 3 hours :) After the sugar rush wore down I realized how cool the box is. Not only does it have goldfish in bright colors but there is a hidden magnetic closure that keeps the lid closed. Pretty cool.


I started thinking about what I could put in it. Sharpies perhaps?


Or to keep some sewing notions in?


Or maybe I will keep the box for The Bubb until he wants to collect things and then he can put matchbox cars, leaves, bird nests or bouncy balls in it. I think I'll just have to wait and see.

4.09.2011

Tutorial: Felt Numbers


Okay so I know that The Bubb is a little on the young side to be learning to count. But when I made this felt seven for his 7 months old post, I just couldn't stop thinking about it and decided to make a whole bunch (but on a smaller scale). Cause well why not?


Felt numbers are really easy and cheap to make and hopefully they'll get a lot of use at some point.

Supplies Needed


1 Colored felt. I used maybe a 1/4 yard of a variety of felt colors. This is a great way to use up scrap felt you have on hand!
2 Polyfill or something to stuff them with. I would think beans of some sort would work if you want them to be heavier (in case you want to toss them)
*I also found a chopstick really helpful to stuff them

Okay lets get started!

  
Step 1 Type numbers in a word document and then print them out. I used Century Gothic size 500 but the size and font is entirely up to you! You can also just sketch out your own numbers too.  In order to save ink, etc. I  made the numbers into an outline before printing. The numbers I did were 0-9 plus a +, -, = and / just to make it complete!


Step 2 Cut those numbers out.


Step 3 Put the number onto the felt to see how big a piece of felt you'll need, then double it. Cut out that piece of felt. Then fold the felt in half and place the number on top.


Step 4 Pin the number to the felt. (you could also trace them with chalk/disappearing ink, but for me these tools always waste a lot of my time and this seemed just as easy)


Step 5 Sew around the number on your sewing machine but make sure to leave a finger sized hole. If you wanted flat felt numbers (i.e. no filling), don't leave a hole, just stitch all the way around. If you are sewing the 8, 6, 9 and sometimes 4, go ahead and stitch around the "circles" inside those numbers.


Step 6 Remove the paper number and pins and cut out the felt number. I left about a 1/8" of felt on the outside of the stitching. Also leave some felt around where the hole you left is. It makes it so much easier when stuffing and when sewing that hole closed later on. Cut out the "circles" in the 8, 6, 9 and 4 as well.


Step 7 Stuff your number with your filling of choice. I used Polyfill. There are tons of options out there. You could also use some sort of beans to make them heavier. I found a chopstick to be very useful to help get the stuffing all the way around in the numbers. You can stuff them as little or as much as you want, it is entirely up to you. I think I overstuffed mine a bit, but they still look okay to me!


Step 8 Stitch up the hole.


Step 9 Cut off that tail flap of felt.


and you're done! Admire you newly created felt numbers.


If you wanted to make a felt alphabet obviously the steps would be the same, but I'll do that some other time! I tried them out on The Bubb. He didn't like them quite as much as the felt gingerbread men but still seemed entertained. 


I've put this into the Tutorials in case you want to find it at a later point. Hope everyone is having a good weekend and happy felt making!
Related Posts Plugin for WordPress, Blogger...