12.27.2010

Christmas Day Festivities

Our first Christmas as a family of three!

Early morning present opening:


Christmas Brunch:


Christmas Dinner:


 Boxing Day Bath:


12.24.2010

The Bubb's First Christmas

I had been meaning to go out and buy one of those "Babies First Christmas" ornaments, but I just never got around to it. And I realized this yesterday. Not wanting to brave any type of store that may have holiday shoppers, I decided to make him one instead. He is pretty excited by his ornament.


To make it, I first cut the numbers and two circles out of felt. Then I just stitched them on with the sewing machine. From there I added the ornament hanger and hand stitched around the outside with some crochet thread. Before I closed it up I added some poly-fil to make it a little puffy. I also put his initials on the back because I figured if I was making it I could personalize it a little.


12.23.2010

Superhero Cape


The final present is finished at last. Yeah for not being up 'till the wee hours of the morning Christmas Eve. And what is the final present you ask, a superhero cape! Yeah for boy ideas, although I am pretty sure that I had a cape fashioned out of a few yards of fabric when I was in my She-Ra phase way back in the day.

So as you can probably tell by the "J" superman initial that this cape is for Jack.  It was pretty easy to make after I got my head around how I was going to assemble it. My favorite part of the whole thing, silly as it is, was making the fabric gather. It was so neat how it started to bunch as I sewed along, okay I won't digress about it but it made my night, obviously there isn't too much excitement in my life! Ha! I used velcro to have the cape stay on because ties just didn't seem right to me and I really didn't want to fight with the snap press that I have.


In addition I also made a little mask. I used eyelets for the elastic to go through and it is pretty adjustable as I am not sure how big his head is, so hopefully it will fit! It is too small for Evan and just a tiny too big for the Bubb, so that must be Jack size! I can't wait for him to see it, I hope he likes it!


12.22.2010

Cloth Balls


These cloth balls were actually one of the first projects that I made when I was pregnant and decided that I needed to learn to sew if I was going to have a kid. I think that now I could obviously make them look a little better and I would probably insert a little bell inside of them before I sew them up. So I like them because there are three sizes and I thought that they would be perfect for a boy baby.

The largest measures about 12 inches and the smallest is around 8 inches from end to end (using a tape measure that hugs the ball). I made them with 8 stripes, using four fabrics, but you could make them with 8 different fabrics or only 2. The possibilities are endless. Now the part that I would improve is the circles at the top, I had no idea how to sew curves when I made these and I think that I could definitely hand stitch them up a bit better. The circles serve two purposes, one to add interest (by using red flannel in this case) and two to cover up your points in case they don't match up. Looking back at them now I like them so much that perhaps I will make more at some point to give as a gift at a baby shower. The other fantastic thing that has come out of them, is that The Bubb loves to look at them and when he sees them he turns over towards them and tries to move towards them in order to touch. Although his stomach dragging on the ground prevents forward movement. Oh well, it is only a matter of time.


12.19.2010

Can't Catch Me I'm the Gingerbread Man


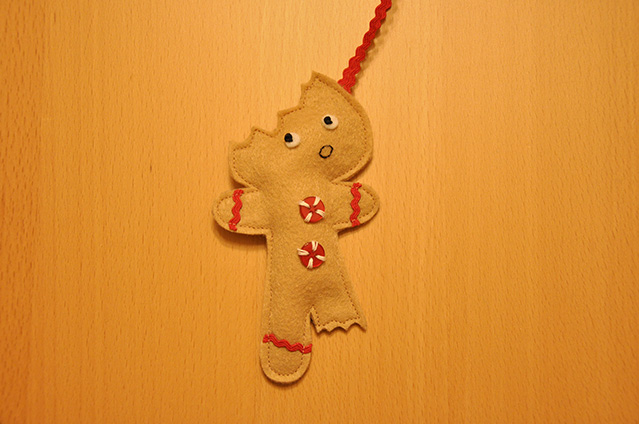
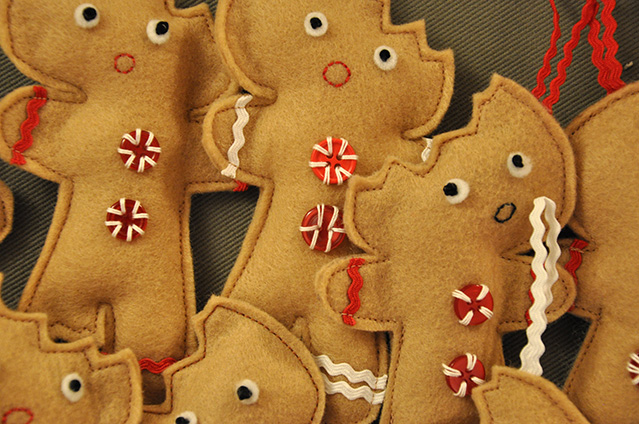
In the blogosphere of crafts I stumbled across a tutorial for half eaten gingerbread ornaments which I thought were super adorable. You can find it here on Meg's blog Elsie Marley. So I more or else followed the directions. To make these I used her pattern but enlarged it a bit, felt, red buttons (although I think it might be fun with green ones too), baby rickrack (I used both red and white), polyfill, and thread.


I actually ended up using crochet thread for the eyes and to attach the buttons because I had it on hand for another project. And I can finally say that I have mastered french knots! It took my Martha Stewart craft book, two online tutorials and a video on youtube to get me through it, but I can now do them consistently. I also got to brush up on my backstitch and to try out fray check. 


I'm pretty pleased by how they turned out but it definitely challenged my sewing machine skills to the point that I almost gave up and just sewed them up by hand...


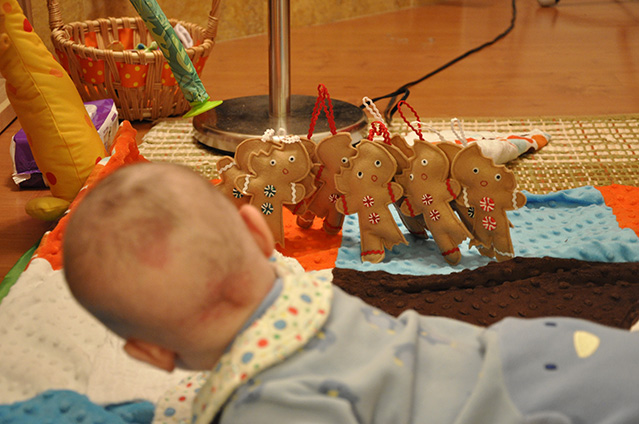
I decided to make a few more a few days later so I could give them as gifts...The Bubb really is intrigued by them. I am thinking of making a much larger version for him to play with, but haven't had the time yet.


12.16.2010

A Tutu For Maddie


What does every girl need to complete her wardrobe? A pink tutu.

During my many meanderings on etsy, I've often come across tutus and thought that they would be perfect for Maddie. And after talking with Christie (her mom) we decided that she needed one. So after

5000 times of asking myself why I just didn't do the simple tie the tulle onto the elastic tutu,
32 yards of tulle,
26 inches of ribbon,
17 inches of elastic,
2 machine jams,
and 1 very patient husband

later Maddie has her very own pink tutu. I really hope she likes it but I'll have to wait 'till Christmas to find out.


For those interested in the construction portion. I cut the 32 yards of tulle into 24x6 inch strips. I then folded those pieces in half to make 12x6 inch pieces and gathered them at a corner. From there I took elastic string and proceeded to square knot the string while inserting the gathered inch or so of the tulle corner inbetween each square knot segment to get something that looks like the picture below.


So when finished knotting all the tulle, I ended up with this.


From here it got really tricky and this is probably why no one makes tutus this way, but instead just ties the tulle onto elastic. But I didn't want this tutu to look like that. So what I did was sew 26" of 4" wide ribbon together to make a band. Then I basted the ribbon onto the tulle (this was the part that made making the tutu possible). From there I sewed the ribbon onto the tulle (I ended up using about 20 hairbands to try to keep the tulle under control while sewing) while leaving an opening for the 1" elastic. I then inserted the elastic and sewed up the seam. I wanted to make sure the elastic would work so we had to try it on!


I can't wait for her to see it!


Related Posts Plugin for WordPress, Blogger...