
Tired of the ugly baby gear that is in the stores, I have been prompted to figure out how to make some of my own, starting with changing pad covers. Of course making your own will probably cost you more than the $6 one you can get on sale at Babies R Us or Walmart, but it will be way PRETTIER and you have the satisfaction of knowing that you made it!

This cover will fit a standard changing pad (roughly 16x32) So what do you need?
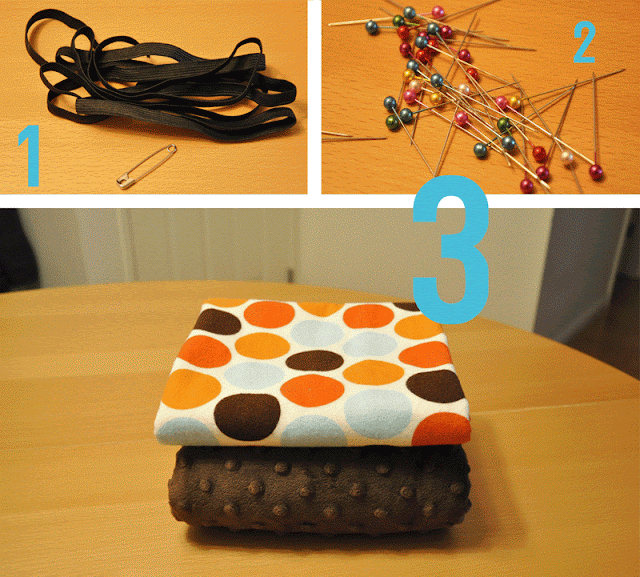
1 36 inches of 3/8" Knit Elastic (if non-knit elastic I'd use 40") and a Safety Pin. Usually I use white elastic, but this was all that JoAnns had after Halloween, and since it is encased, it doesn't matter.
2 Sewing pins
3 Fabric measuring 32 inches x 48 inches. You can use as many different fabrics as you want, but after you sew them together to make your design, it needs to be 32x48. For example HERE I used more pieces of fabric. In this tutorial, I used a 32x18.5 inch piece (the dots) and a 32x30.5 piece (brown minky).
Okay now that you have your supplies, lets get started.
Step 1 After you've washed and ironed your fabrics, cut them to the desired length for a collective finish size of 32x48 inches (after you sew them together).

Step 2 Place the dots on top of the minky, right sides facing. And pin into place. After pinning, sew with a 1/2" seam allowance, backtacking at both ends. You should end up with one piece that measures roughly 32x48.


Step 3 Now on to creating the corners. To do this, we need to cut out four 8" squares from each corner. (You can cut them all at once or one at a time, doesn't really matter. In this case I folded it in half horizontally and did two corners at once. One set of cuts on the flannel and one set of cuts on the minky.)


Step 4 Looking at the top right corner, take the bottom of the "L" and fold it up to the side of the "L", right sides together. Pin in place, and do the same for the other three corners.


Step 5 Sew that corner together. I used a 1/2" seam allowance, and I sew from the "corner" to the edge of the fabric. That way if the fabric shifts, the excess is easier to cut off and doesn't bunch the point. Of course backtack at each end. You should end up with 4 corners.


Step 6 Iron all the seams open, as it makes it easier to thread the elastic through later on.

Step 7 Creating the elastic casing. Starting at a corner, I fold the fabric up roughly a 1/2". Then I roll that up about 3/4" to an 1". I then pin that corner seam in place. Do this all the way around the cover. If you want to iron that 1/2" fold and the final fold, you can do that, but I am lazy and don't want to be bothered with more ironing. Place a stop pin in if you need to remind yourself that you're at the end and you need to stop to create a hole and not close it off.


Step 8 Sew that elastic casing down. I start at a corner seam (as I think it looks cleaner) and work my way around with an 1/8" seam allowance, stopping just at the other side of the seam, which leaves about 1/2" hole. Backtack at both ends.


Step 9 Cut your elastic to be 36" long if you haven't done that already. Attach a safety pin to one end. Thread the safety pin into the opening at the corner you just created and inch worm that safety pin all the way around. Pull the safety pin out when you've gone all the way around.


Step 10 Stitch the two ends of the elastic together either using a zigzag or make an big X. (this is always the hardest part for me to do cleanly for some reason, oh well, no one ever has to see it!)


Step 11 Pull on the cover to get the elastic ends you just sewed to disappear into the casing. Make sure the elastic is pushed all the way to the side (so you don't sew over it). Then sew that opening closed!


Stretch the cover out so the elastic shifts to be more even and you're done!! Yeah!

Try it out on the changing pad.


Tips I've noticed that it fits the changing pad better after you wash it (probably cause the elastic gets shaped properly inside). In this case I used a beige thread, as the seams don't show and it was already on my machine. Normally I'd probably match the thread to the fabrics better.

Enjoy your new changing pad cover!

This cover will fit a standard changing pad (roughly 16x32) So what do you need?

1 36 inches of 3/8" Knit Elastic (if non-knit elastic I'd use 40") and a Safety Pin. Usually I use white elastic, but this was all that JoAnns had after Halloween, and since it is encased, it doesn't matter.
2 Sewing pins
3 Fabric measuring 32 inches x 48 inches. You can use as many different fabrics as you want, but after you sew them together to make your design, it needs to be 32x48. For example HERE I used more pieces of fabric. In this tutorial, I used a 32x18.5 inch piece (the dots) and a 32x30.5 piece (brown minky).
Okay now that you have your supplies, lets get started.
Step 1 After you've washed and ironed your fabrics, cut them to the desired length for a collective finish size of 32x48 inches (after you sew them together).

Step 2 Place the dots on top of the minky, right sides facing. And pin into place. After pinning, sew with a 1/2" seam allowance, backtacking at both ends. You should end up with one piece that measures roughly 32x48.


Step 3 Now on to creating the corners. To do this, we need to cut out four 8" squares from each corner. (You can cut them all at once or one at a time, doesn't really matter. In this case I folded it in half horizontally and did two corners at once. One set of cuts on the flannel and one set of cuts on the minky.)


Step 4 Looking at the top right corner, take the bottom of the "L" and fold it up to the side of the "L", right sides together. Pin in place, and do the same for the other three corners.


Step 5 Sew that corner together. I used a 1/2" seam allowance, and I sew from the "corner" to the edge of the fabric. That way if the fabric shifts, the excess is easier to cut off and doesn't bunch the point. Of course backtack at each end. You should end up with 4 corners.


Step 6 Iron all the seams open, as it makes it easier to thread the elastic through later on.

Step 7 Creating the elastic casing. Starting at a corner, I fold the fabric up roughly a 1/2". Then I roll that up about 3/4" to an 1". I then pin that corner seam in place. Do this all the way around the cover. If you want to iron that 1/2" fold and the final fold, you can do that, but I am lazy and don't want to be bothered with more ironing. Place a stop pin in if you need to remind yourself that you're at the end and you need to stop to create a hole and not close it off.


Step 8 Sew that elastic casing down. I start at a corner seam (as I think it looks cleaner) and work my way around with an 1/8" seam allowance, stopping just at the other side of the seam, which leaves about 1/2" hole. Backtack at both ends.


Step 9 Cut your elastic to be 36" long if you haven't done that already. Attach a safety pin to one end. Thread the safety pin into the opening at the corner you just created and inch worm that safety pin all the way around. Pull the safety pin out when you've gone all the way around.


Step 10 Stitch the two ends of the elastic together either using a zigzag or make an big X. (this is always the hardest part for me to do cleanly for some reason, oh well, no one ever has to see it!)


Step 11 Pull on the cover to get the elastic ends you just sewed to disappear into the casing. Make sure the elastic is pushed all the way to the side (so you don't sew over it). Then sew that opening closed!


Stretch the cover out so the elastic shifts to be more even and you're done!! Yeah!

Try it out on the changing pad.


Tips I've noticed that it fits the changing pad better after you wash it (probably cause the elastic gets shaped properly inside). In this case I used a beige thread, as the seams don't show and it was already on my machine. Normally I'd probably match the thread to the fabrics better.
Enjoy your new changing pad cover!
I followed this tutorial to make a changing pad cover for my baby's nursery and it came out great!It was very clear and easy to follow. Like your blog very much!
ReplyDeleteWhere did you get the dot fabric?
ReplyDeleteHi! Its called All Star 2 by Riley Blake...I am pretty sure it is no longer in print. But you might be able to google it and find it at a quilt shop/etsy shop that still has a little bit left :)
DeleteGreat basic changing pad tutorial. Thanks for sharing this with the world. Easy to follow.
ReplyDeletewonderful tutorial! It was so simple to make,I also made a second one to use as a toddler car seat cover for it was a perfect fit. As I live where it is very very hot and the straps and buckles can get very hot...
ReplyDeleteThis tutorial was AWESOME! I found the exact changing pad cover I wanted on Etsy - for $45! No way. So I decided to make my own, with your tutorial! It was sooo easy. Just one part that was tricky for me - when feeding the elastic through the casing, it got caught on the seams all 3 times - even though I ironed the seams flat like you said. Any suggestions?
ReplyDeleteHi! I am so glad you found it useful :) Yes so the safety pin probalby got caught in the seam pocket from ironing - just take it slow and try to angle the safety pin to one side or the other to poke it through the actual opening instead of getting stuck in the "pocket". The other option would be to iron to the side and then just thread the elastic in the direction of the way you ironed them seams to the side so it is smoother sailing.
DeleteWhen I make these now, I use a serger and serge the corner edges and along the entire bottom edge. Then I just fold up the bottom edge and stitch to make the pocket, instead of multiple foldings to make the elastic casing. This works really well as it can't get stuck on any 'pockets' as the edges are serged. Must faster and simpler, but I know that not everyone has a serger :)
Thank you! I'm going to try to iron to the side and thread the elastic that way. I don't have a serger :) Do you ever make contoured changing pad covers? If so, I'd love to see a tutorial on that!
ReplyDeleteI made a second one and ironed all seams to one side and then fed the safety pin that way - worked like a charm! One thing I did not expect - I used minky for the first time with this second one. That stuff isn't easy to work with haha! Again, thanks for such a great tutorial!
ReplyDeleteHi! I am so glad that worked better for you, and yeah minky takes a bit to get used too :) I actually have a contoured changing pad and use this 'pattern' for them, as the fabric sags a bit and with the baby on it it looks good :) Anyway I am so glad that it worked out well for you, thanks so much for taking the time to share!
ReplyDeleteYou said this would cost more than the $6 one at BRUS or Walmart...what would you say this cost you to make? Do you have an etsy shop??
ReplyDeleteHi :) Unfortunately I don't remember how much these materials cost, probably including the elastic, it was around $15? But it will depend on the material and the 'quality' of the materials you use minky/flannel/cotton/fleece/etc. and if you buy the materials from Joann or a quilt store or have coupons. And yes I have two etsy shops (one for baby gear and one for fabric - the links are up at the top of the page ;) )
DeleteWill this way actually fit for a contoured pad as well?
ReplyDeleteYes! The changing pad I have is contoured (the one showing in the pictures):)
DeleteLove it! Thank you SO much for your reply, I am using cotton fabric that I have prewashed! The actual measurements when complete will be Width 32 and length 48 " ? or Standard size 16"Width and 32" Length? If so I should add about 1 inch extra all around for sewing correct? Thank you~smiles~ sewing for my NEW grandson who is due in a few weeks and just a little nervous~
DeleteKristina, I just reread your instructions which seem clearer now, thank you for your time if you'd like to reply to my previous questions go ahead if not I think I got it now!
DeleteJust an over worried Nana to be~ smiles~
Hi :) Glad you got it solved! If worried about it fitting you can always make one out of scrap/old fabric and just cut and sew up to the corner part. Then try it on the changing pad, that way if you need to add an extra inch or so, depending on your needs, you can budget for that on the 'final' one. But using these measurements has always worked for me and I've made 100s :) (although I do now use a serger instead ;))Congratulations on your soon to be new grandson!
DeleteThank YOU Kristina~ smiles~ from Nana to Be
DeleteThanks for the tutorial. It came out great!!
ReplyDeletelove it.. thank you. you have inspired me to do my own :) can i ask where you bought that piece of furniture its amazing.
ReplyDeleteHi! Wonderful :) Of course! All the furniture in the pictures is IKEA (the black dresser is Malm and the birch dresser set is Aneboda - I think, its been a while)
DeleteThank you for this tutorial! I just finished mine, and it looks fantastic!!!
ReplyDeleteHere's how mine turned out. I used yellow and gray. LOVE the result!
http://www.lotsofsteps.com/2013/03/nursery-crafts-1-and-2.html
Really awesome tut. I put it into my baby projects page on my site. I used striped fabric to make cutting and hemming even faster. :) This was so easy, I would bet it took me less than an hour--would have taken less than 15 minutes without running the drawstring through it.
ReplyDeleteThank you so much for this FREE tutorial. :) I am not real great with the sewing machine, but I was able to make this no problem! It fits perfectly. I may even make a second!
ReplyDeleteUpdate: Just made my second one, this time I'm giving it away as a baby gift. I bought fabric to match their nursery's theme. Can't wait to give it away, I think she'll like it! :) Thanks again!
ReplyDelete