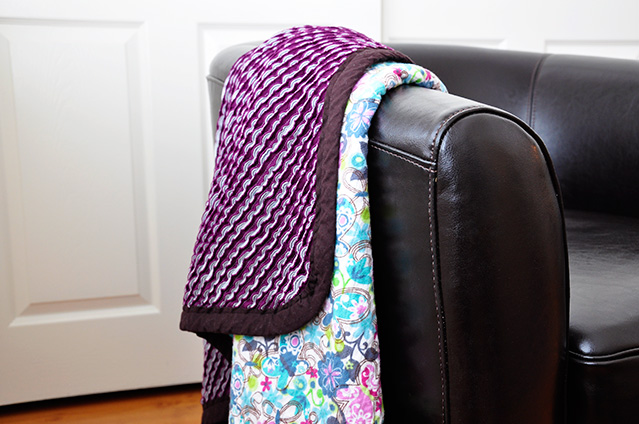
Okay so when I set out to make this blanket, I really wasn't thinking 'quilt', as a quilt means quilting (and for some reason when I think of quilting I think of little pieces sewed together and not the actual "quilting" part, which is what actually makes a quilt a quilt). But since this blanket requires quilting to make it, I've now crossed over to a whole new world possibilities. So without further adieu here is my first quilt!
[The other random thing about this quilt is that I didn't make it for The Bubb (obviously) or anyone in particular. I had found this ballerina fabric (probably when I was buying tulle for Maddie's
tutu) and couldn't resist it. Then I found this
tutorial at Aesthetic Nest and decided it was the perfect fabric for a test run before I make one for The Bubb. But it turned out really easy to make, so I think I might give it away?!]
Below is how it all came together....
Supplies used:
1 yard ballerina flannel fabric
4 yards of Kona cotton in 4 colors, 1 yard each
1 yard of Kona cotton for bias tape
2" bias tape maker
Walking Foot (not necessary but certainly made this project easier)
I started by placing the ballerina flannel face down on the floor and then layered the 4 yards of Kona cotton on top (all face up). Then I pinned them together with safety pins.
I didn't worry about cutting them to size, as I anticipated the fabric to shift a ton while sewing (but it actually didn't, but still it made one less step of cutting). After I got it pinned, I drew a diagonal line across the fabric (corner to corner) with a disappearing fabric pen on the ballerina flannel side (as that is the side I was going to sew on). Then I stitched straight down that line through all 5 layers of fabric (this is why a walking foot made the world of a difference).
I used this first line as a guide to sew another line one half inch away from it and repeated until I had half the fabric stitched together (I moved the needle to a position so I could use the edge of the foot as a half inch guide). After doing one half, I started again from my original diagonal line and stitched the other half of the blanket, until the whole thing was quilted.


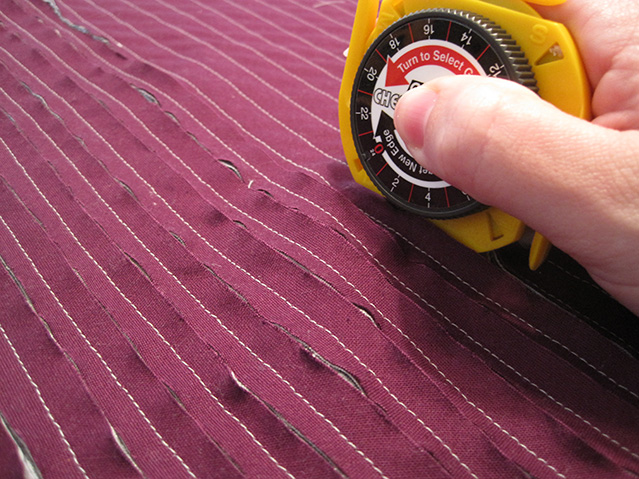
Okay so after that was done (it took me a about a day working solid during The Bubb's naps and after he went to bed to get it finished). Next I trimmed the sides and made the corners round (I used a bowl as a guide). Now this is where it becomes interesting. To make the faux chenille side of the quilt, I cut through the four layers of the colored fabric but NOT through the ballerina fabric inbetween each row of stitching. After cutting you can see all the layers of the Kona fabric peeking up at you. Cutting all of this took about a day as well, and yes my hand seriously was cramping by the end. Apparently they make a tool that will cut for you but I decided to just power through!


Next I made bias tape. I had never made this before, so I bought a 1" bias tape maker, thinking oh 1" that will be 1" on each side. Wrong. Apparently my brain doesn't think like other peoples, so it only made 1/2" tape. So I had to find a 2" bias tape maker, which no store carries. Thanks to my mom's super duper fast amazon shipping my tape maker arrived yesterday so I could finish the quilt! I attached the bias tape and stitched it down.
After the blanket is finished you throw it in the wash and wait for the "magic" to happen. When it comes out of the dryer, all those lines you cut become frayed and super soft making chenille on the back.
And with each wash it just frays more, and the ballerina side crinkles a bit form the quilting. Pretty exciting. Now I just need to make a boy one for the littlest Bubbadoo.
*Post Update: Since this I've now made another one but using a chenille cutter instead, you can check it out
here*


