Showing posts with label holiday. Show all posts

12.12.2012

How To Make A Christmas Wreath


I love having a good wreath and typically buy mine at Whole Foods or Trader Joes and then decorate them, as seen here. But I really wanted to try making a wreath this year. And it turned out to be an easy 15 minute project with no headaches. I was pleasantly surprised.

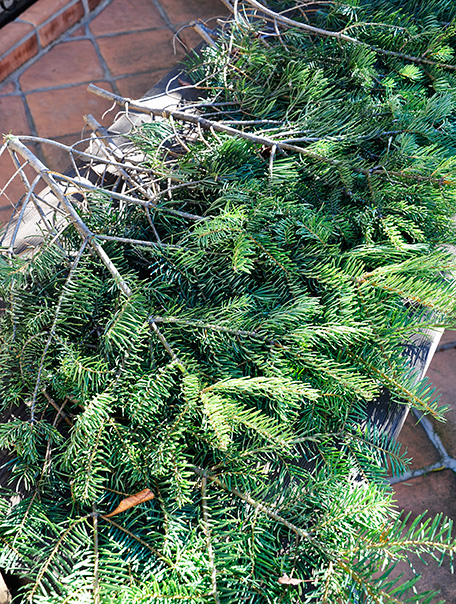
One of the reasons it was so easy is probably because I had all the supplies on hand...wreath frame, green florist wire, purning shears and most importnatly left over Christmas tree branches (the ones that get cut off in order to make it fit in the stand).


It was really easy to do. Start by wrapping the florist wire around one of the spokes of the wreath frame, then wrap it around the frame, in the same spot, 3 or 4 times, and make it tight. No fancy knots or anything, just keep wrapping it. Then put on the first branch, then wrap the florist wire around the base of the branch, then add the next branch and keep wrapping. Don't cut the wire inbetween, just keep it one long piece. I wrapped each new branch probably 3 or 4 times before adding the next and tried to not squeeze the smaller branches in with the wire but wrapping in between them. Then just keep adding branches and keep wrapping. At the end just put the branch(s) underneath the first ones and keep wrapping around, trying to keep the wire hidden.


Then cut the wire leaving 4 or 5 inches of excess. Then I wrapped the excess wire around some of the previous wrappings and did a simple knot, which wasn't even needed.


I tried shaking the wreath a bit after it was done and it was still intact so I figure it can survive the mild California winter weather coming.


It's a bit plain, although I do like the simple look, so I'll probably add some ornaments or pinecones but for now I am just glad that it is done and up. And I am pretty proud of how it turned out since I had no idea what I was doing and The Bubb managed not to hurt himself (or eat any of our succulent plants) while I was making it :)


Off to finish those last minute Christmas orders! Hope everyone is having a good week :)

12.03.2012

Christmas Book Advent Calendar


I kept seeing all these advent calendars last year with small gifts or candy, etc. and I thought that a new toy every night or worse, candy, was just too much, so I thought books. Well apparently I am not alone it seems after doing a google search, so I've joined the book advent calendar band wagon.

Now you're probably thinking that I'm a crazy - a new book, every night, that will get expensive fast. Well for this Christmas, we only spent $10 (yup that's right and only on one book - we get him one new Christmas/Winter themed book every year). So how did I manage to do 25 days of books for $10?

First we own 7 Christmas/Winter themed books already. Two we had given The Bubb already: Snowy Day and Max's Christmas and 5 other books: Winnie The Pooh's Christmas, How the Grinch Stole Christmas, Morri's Disappearing Bag, Bear Snores On and The Mole Family Christmas


Now for the rest? There was no way we were going to buy that many. Solution: The library! I went yesterday and scored all the books that I needed. No they are not all the best winter/Christmas stories ever but the majority are pretty good and we can try them out without spending money on amazon for books unknown and we can slowly purchase the favorites over the next few years.

Okay so wrapping. Yes I wrapped all of them. Regular paper gets expensive and lets face it who wants to cut paper to size for 25 presents in one evening. Not me. (and my lovely husbanad said, isn't there a cheaper way and suggested tissue paper). So that is what I did and I didn't have to use the scissors once as tissue paper is already the perfect size (or at least the type I used). Yes you can kinda see through them, but he is 2 and doesn't care anyway. It took me about 30 minutes to get them all done. No fancy ribbon or anything.


I was going to number them, so that I could put the library books up front incase I couldn't renew them, but since I can sorta get a glimpse of what they are anyway through the tissue paper I can encourage The Bubb to choose the library books first. But I don't think that renewing is going to be a problem, so it is good. And now after the second night we've decided that we will just pick the next book, as having a 2 year pick out of 25 right before bed, means stall stall stall. So it is faster and simpler and he is just as pleased.


(sorry for the blurry pictures above, he was moving WAY too fast for me to refocus each time. Evan and I also both agree that it is good we're doing this as he is super slow at unwrapping. It takes him forever as he likes to take off about a square inch each time, which is nice that he likes to prolong it but Christmas is going to take seriously way too long, so we have 23 more days to get him up to a tolerable speed)

We read the Polar Express last night and while it is a little old for him, he kept calling the train Thomas, which I thought was so cute, and was totally captivated by the pictures. Love that book.


My next project is to start on my Christmas wreath. I am going to try to attempt to attach the branches myself instead of buying one premade and decorating like year's past. I have the branches but they are outside and it has been pouring rain the past few days and so they are soaked too. It is supposed to be sunny tomorrow so hopefully I'll be able to dry them out a bit.

4.06.2012

Dyeing Easter Eggs with Food Coloring


I realize that Emmett is a little young to be doing easter egg dyeing but I couldn't help myself. I was at Trader Joe's yesterday getting milk for him and there were the eggs, sitting there looking at me. I looked at him and back at the eggs and grabbed a carton.

Last night I was looking around our house for things to do natural egg dyeing. Like this. But alas we hardly had any of those ingredients. And I wasn't about to run out to the store to get stuff for an activity that will last about 5 minutes and not even be used (yup I hate eggs - yes all kinds, hard boiled, scrambled, sliced, omelets, egg salad, etc. yuck!)


So during my searching in the pantry I found some food coloring. And thought ah-ha! This has got to work. And lo and behold on the back of the box they have instructions! Like it was meant to be. I love it when things like this happen.


So to create the dye baths, I used 1/3 cup vinegar, 20 drops of each color and then 1 1/2 cups of warm water. I made 6 colors: red, yellow, green, blue, teal and purple. I made the teal and purple by following the mixtures on the back of the box.


Then after boiling the eggs I plunked them into their baths. Emmett had a pretty good time, although there was more interest in stirring rather than looking at the eggs, but hey he stayed put through the whole thing so that was exciting :) Here is a little video, although I am mostly telling him to be gentle, but still there was no spillage and only one egg casualty.

Okay so I am having serious issues uploading this video to blogger...so...if you want to take a peak I've put it on YouTube and you can get to it here. I will keep trying to insert it later on :)

So this is how they turned out


The colors are really bright (I let them sit probably 10 mins or so) and I think the slight discoloration is probably more form imperfection on the eggs rather than the dyeing. The teal and green turned out to be pretty much the same. But I love how dark the blue one is and the purple one!

With the left over dye we did some watercolor painting


and this is how it turned out


9.13.2011

Hand Print Thank You Cards


My sister-in-laws always have their kids color and put stickers on their thank you cards that they send out. I don't know if this is a normal practice that parents do, but I LOVE it. However The Bubb is a little too young still to really be able to color or put stickers on something, just give him a few months :), so I wanted to do something and decided that he could stamp his hand on them. He loves to dab his palms in mustard when eating his turkey dogs so I figured that this is sorta the same thing but not with food.

I set up a big square of packaging/butcher paper on the floor (FYI this stuff is super cheap and super nice at your local hardware store - Lowes, Home Depot, OSH, etc. Instead of going to Office Depot and paying way more for the same thing but less of it and a lesser quality). Then I placed him in the middle of it.


Sorry there are no during pictures as I couldn't figure out how to take good pictures, keep him from crawling off with ink hands or trying to eat the note cards. The steps were pretty basic. Push hand onto ink pad (the ink pad I used came with some hand print/foot print kit as a baby being born gift). Press inky hand onto thank you card. Move card out of way before he can grab it with other inky hand. He actually liked it the first couple of times and then well got distracted. So I will just share the finished product.


Then I just added a little note and sent them off.


On another exciting note I've just finished my second bag and am waiting for the fog to clear out so that I can take some pictures of it later this afternoon. So excited to share it with you :)

9.05.2011

UNO Birthday Party Roundup

Just wanted to share some birthday party pictures with you to conclude The Bubb Birthday Week :)


We opted to have an UNO themed birthday party to celebrate The Bubb being one year old. We sent out UNO invites


and I made him a Wild card t-shirt for the party using freezer paper stenciling. I had thought about making him an UNO shirt but decided that Wild suited the situation better, plus I've been wanting to try multiple colors on the freezer paper stenciling. It was well, um, interesting. I wouldn't recommend starting with multiple colors especially when you have a one year old trying to climb up your leg while painting!


Finding a black t-shirt proved to be difficult and finally was able to find a long sleeved one at Target and just altered it to be short sleeved.

The party was pretty simple. We made cupcakes and decorated them with white frosting and numbers on top and then just had primary colored accessories for napkins, plates, etc. I hung up the birthday banner that I made.


And we had balloons. I have been dying to have a reason to get some 3 foot balloons. I think that I can die happy now, is that crazy!? Okay so we got one of each color - red, blue, green and yellow. They are actually pretty hard to find and ended up getting them at SF party in San Francisco. We then rented a helium tank because we couldn't get them inflated at the store, as they wouldn't have fit through the door into our cars, not to mention getting all 4 of them to fit! Here we are blowing them up:


Of course we took some pictures with them :) and tied one to The Bubb. You have no idea how amused I was! (FYI if he had been 5 pounds like I had wanted, it is possible that I would have put him in a basket and bought 33 of these balloons in order to get him to hover off the ground. (my brother did some calcs on lift). Anyway not important since he weighed WAY more than that when born, and the parent police probably would have come and frowned at us.


The party was lowkey and was exactly what I wanted :) We ate some cake,


opened some presents,


played ball, chased each other around on the deck.


He had a wonderful time and I am so glad that my parents were willing to let us use their house :)

8.30.2011

Tutorial: Birthday Banner / Birthday Bunting

I always hear the word bunting now instead of banner and perhaps I've just lived in my bubble for too long as I really didn't know what a "bunting" was, a fancy name for a banner? So I looked it up on Google. It is "flags and other colorful festive decorations". So I guess this birthday banner is a birthday bunting. Either way, these are my steps for how I made The Bubb's first birthday sign decor.


Supplies:

1 1/2 yard of EcoFelt (from JoAnn). I used many different colors but all in all including the backing it was less than a 1/2 yard. (you could easily make them with regular cotton fabric, etc.)
2 Lite-steam-a-seam 
3 Twine/Rope/ribbon/etc. I got 5 feet of this cotton tape stuff at JoAnn. I liked the look of it as opposed to a round rope type.


I know there are many ways to put these together, but this is how I made mine :)


Step 1 Print out your letter (or hand draw). I used Century Gothic size 475. I printed them on binder paper and in outline form. Now originally I cut them all out, as shown below, as I wasn't really thinking about what I was doing and was thinking felt numbers. BUT you don't need to cut them out if you are going to applique them on - which is what I am about to do :)


Step 2 Trace the letters backwards onto Lite-Steam-A-Seam or similar. This will make appliqueing much easier. This is also why you don't need to cut them out, as you can just trace them from the paper straight on. If you have a hard time seeing the letters backwards through the paper, just trace them with it held up to a window or light-box.


Step 3 Place each letter onto the felt color that you want. Peel off the extra paper so that the sticky side is now on the felt. If you are using regular fabric you'd need to place them on the wrong side of the fabric, but for felt it doesn't matter so much.


Step 4 Iron them down.


Step 5 Cut out the letters (this has always been one of my favorite steps for any applique project)


Step 6 Cut out the rectangle backings (or pennant shape backings). Mine were 6.25 x 7 inches.

Step 7 Place and center the letters onto the backings. Peel off the other paper side of the letters and now you have a sticky side again, and press them onto the backs. Then iron them down. At this point they will stick forever pretty much if you do a good job ironing.


Step 8 But I decided that I wanted to top stitch them for a more professional look.


Step 9 Place the letters onto the twine/string/ribbon/bais tape/etc. and pin down. I found the center of the 5 ft and started there and worked out, as I didn't know how much extra I wanted on each end for hanging. I placed them pretty much right up against each other - that way when they are hung in an arc, they will separate a little and won't have additional space in between them.


Step 10 Sew them down. I didn't wrap them around the top or anything like that, just lined them up to the top of the cotton tape and then sewed a 1/4 inch down from the top.


And you're done! I also inserted a "blank" square inbetween Happy and Birthday. Then I opted to add a cute a little party hat, made out of felt, to make it more interesting.


Right now it is hanging up in The Bubb's room but I really made this to hang at the party, but I figured he could use a little decoration in his room (since I still haven't gotten around to really decorating...at least it is painted and has felt garland :) )

Related Posts Plugin for WordPress, Blogger...