6.27.2011

Dinner for Two


Usually I don't share about food, as we tend to keep things easy and quick (read simple) and so it doesn't seem like you'd be interested.


But when we were making our shopping list yesterday morning we happened to be reading Sunset at the same time, and well we decided to try a recipe out of a magazine for once.


The recipe is Wild Salmon with Grilled Sweet Onion and Corn Relish. It was really for 4 people so we just halved the recipe. And it almost looks like the picture! We didn't use a grill (we don't have one) so we had to cook it a little different but it was still amazingly good :) Happy Monday!

6.24.2011

Tutorial: Pocket Bibs


Over the past few weeks we've noticed a need for a bib with a pocket. With The Bubb now picking up more of his foods with his tiny fingers, not all of it ends up in his mouth, but instead ends up in his lap, past his bib. I've seen bibs with pockets on them at the store and always sorta thought they were dumb, but I was wrong. It is perfect for this stage of eating.


I decided that I could fashion up a couple of them quickly last night to accommodate this new need. They are pretty easy to make and I made two in about 45 minutes. There are lots of variations one could do: bias tape trim, velcro or tie closure, backing no backing, etc. For us I decided that a laminate front would be ideal with a terry cloth back and a snap closure. Conveniently I had some laminate left over from the Reversible Playmat so I opted to just go with that as I can easily wipe down the front but still wipe The Bubb's face with the soft terry cloth backing.

Supplies needed:
1 1/2 yard front fabric, 1/2 yard back fabric
2 metal snaps


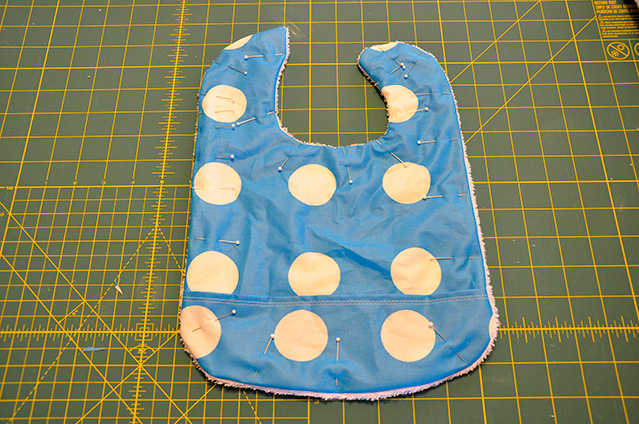
Step 1 Take a bib you already have that you like the size of and trace it on the back (wrong side) of the fabric. I used a sharpie on the laminate as I needed it to show through the fabric to get the pocket on. Probably shouldn't have used a sharpie on the yellow fabric but oh well! When I was tracing my old bib I actually made it about 2 inches longer than the original one as I wanted it to hang lower. So I just moved the bib down as I was tracing the sides so that I could still follow the curve of the already made bib. Side note - it is always helpful to trace a bib that is already symmetrically made, this one wasn't and I was too lazy too correct it.


Step 2 Trace the bottom portion of the bib onto the back of the fabric. This is the front part of the pocket. If you want it to really match up, trace it onto the front of the fabric as that is the part that you will see and you can get it exactly where you want it. Cut it out. How big? Well how big a pocket do you want? Mine is about 3 inches deep.


Step 3 Press the top (straight edge) of the pocket portion down about 1/2 inch. Then sew with a 1/4 inch seam allowance straight across. I did a second row of stitching an 1/8 below that just to make it a little more fancy. I also used a wider stitch, on my machine it was at 3.


Step 4 Pin this pocket to the front of the bib portion, where the pocket is going to be at the end. Because I used a sharpie to trace the bib earlier, I was able to see where the bottom of the bib was and able to align the pocket to the bottom of the bib fairly easily. Pin in place. If you want to move the sides of the pocket (the sides, not the curved bottom part) in a little bit when you pin it makes the pocket pop out just a tiny bit which allows the food to be caught. Sew around the curved part but not the top of the pocket :)


Step 5 Lay the front of the bib onto the backing material. I used white terry cloth as that is what I had on hand. Place right sides together and pin in place.


Step 6 Sew all the way around the bib. I sewed a 3/8 inch away from my sharpie line all the way around, as when I originally traced it, I made it about 1/4 inch larger all the way around. When sewing over the pocket, follow the stitch line of where the pocket is attached. Just stitch right exactly on top of the line. Leave about a 2" hole on one of the straight sides in order to turn the bib.


Step 7 Cut off the excess fabric leaving about 1/4 inch all the way around. Cut triangles into the round section of the bib - this will make it lay flatter after turning.


Step 8 Turn the bib right side out and flatten out. Try to roll the front fabric over the back if possible so the back fabric doesn't show as much.


Step 9 Pin down and top stitch all the way around using 1/4 inch seam allowance. This will also close up the hole you made when turning.


Step 10 Install a metal snap on the ends of the neck parts. You could install two snaps so that it is adjustable or use Velcro. All will work, just a matter of preference.

And you're done! Go try it on the kiddo and see how it looks.


Worked out pretty well too, food was caught! I decided to make two cause well why not? I actually made 3 as the first one the pocket was a little too big. Happy Sewing!


6.22.2011

My First Tote Bag


I have the feeling that making bags is going to be addicting in the same way that making pillows is - as there is something so satisfying in seeing the finished product after all the prep work that goes into it. I was actually planning on making a bag tutorial and started out taking pictures of it to share, but then a few little disasters happened and well it caused me to shift directions a few times and thus not make for a very good tutorial.


Supplies used:
- 1/2 yard of Kokka Cars (canvas cotton weight)
- 1/2 yard of houndstooth fabric (found in the men's suit fabric section at JoAnn)
- 50 inches of red seat belt material (I actually bought two yards as I wasn't sure how much I would need)


I decided to box the corners so that it would stand up and I could fit larger amounts of items in it. Never having boxed corners before, I was fairly frustrated for about 10 minutes before I finally figured out a super easy way to do this, which I am planning on sharing when I make my next bag!


This bag can be used to carry diapers, blankets, other Bubb stuff. Or it can go with us to the library.


And I am pretty excited by the lining. Next time I might put in a snap or a zippered pocked. The possibilities are well endless when it comes to bags!


I decided to put my label on the outside as that is what all the "fashion" bags do and I thought I would do the same :)


On a side note, I finally broke down and bought the little robot fabric by Kokka. I have been drooling over this for months and so I had to share!


6.20.2011

Aviary Patchwork


I have finally finished the Aviary Patchwork and I am a little in love with it. After posting about buying the fabric, cutting the fabric, I thought it only made sense to share the finished blanket! I decided to have some subway tiles blocks mixed in with the regular squares to make up the patchwork. Here are some in progress pictures:


For the backing, I debated it for a very long time and finally decided to go with organic cotton sherpa. Sherpa is similar to fleece but thicker and just as soft. It has a really nice weight to it and I am just in LOVE with it. So by using the sherpa I didn't need to do any batting. I quilted in a zigzag sort of manner around the subway tiles and it left an interesting pattern on the back of the blanket.


I think I might make more blankets with the broken up patchwork like this. But my list of things to make is just overflowing at this point!


I hope everyone is having/had a good Monday!

6.17.2011

Beach Robe


A few weeks ago I got asked by the lovely Dana from MADE to test out a new pattern that she came up with for a beach robe. I was so incredibly flattered that she asked me AND that I get to make something for The Bubb. As you know I don't use patterns and prefer to figure things out (read: make things up) as I go along. But the pattern is straight forward and there are so many variations that you can get exactly what you want. Plus the supplies are super easy to get...a towel, bias tape, and coordinating fabric if you want to line the hood.


I got my towel from Target and it worked perfectly and I was too lazy to make bias tape so I just used store bought, I know ick, but it worked well. For the lining of the hood I used Mineral Dot by Monaluna. I was actually thinking that I could make this robe with sherpa or fleece too! Anyway I decided to back the tie with the same fabric as the hood to have a little more pop of color.


Emmett really likes his new robe, we haven't tried it out at the beach yet as its been not very sunny here on the weekends (and it is summer!). But we use it after bath time and last time we were at the doctor's we actually thought it would be perfect for that, as there is usually a 5-15 minute wait after the nurse comes in before we see our doctor, and he gets cold. Usually we just redress him instead of him hanging out all naked. Anyway getting off topic!


Just want to say thanks Dana and we love our new robe!! If you want to purchase the pattern it can be found HERE and of course you can check out her amazing photos as well :)

Related Posts Plugin for WordPress, Blogger...