6.24.2011
Tutorial: Pocket Bibs
Over the past few weeks we've noticed a need for a bib with a pocket. With The Bubb now picking up more of his foods with his tiny fingers, not all of it ends up in his mouth, but instead ends up in his lap, past his bib. I've seen bibs with pockets on them at the store and always sorta thought they were dumb, but I was wrong. It is perfect for this stage of eating.
I decided that I could fashion up a couple of them quickly last night to accommodate this new need. They are pretty easy to make and I made two in about 45 minutes. There are lots of variations one could do: bias tape trim, velcro or tie closure, backing no backing, etc. For us I decided that a laminate front would be ideal with a terry cloth back and a snap closure. Conveniently I had some laminate left over from the Reversible Playmat so I opted to just go with that as I can easily wipe down the front but still wipe The Bubb's face with the soft terry cloth backing.
Supplies needed:
1 1/2 yard front fabric, 1/2 yard back fabric
2 metal snaps
Step 1 Take a bib you already have that you like the size of and trace it on the back (wrong side) of the fabric. I used a sharpie on the laminate as I needed it to show through the fabric to get the pocket on. Probably shouldn't have used a sharpie on the yellow fabric but oh well! When I was tracing my old bib I actually made it about 2 inches longer than the original one as I wanted it to hang lower. So I just moved the bib down as I was tracing the sides so that I could still follow the curve of the already made bib. Side note - it is always helpful to trace a bib that is already symmetrically made, this one wasn't and I was too lazy too correct it.
Step 2 Trace the bottom portion of the bib onto the back of the fabric. This is the front part of the pocket. If you want it to really match up, trace it onto the front of the fabric as that is the part that you will see and you can get it exactly where you want it. Cut it out. How big? Well how big a pocket do you want? Mine is about 3 inches deep.
Step 3 Press the top (straight edge) of the pocket portion down about 1/2 inch. Then sew with a 1/4 inch seam allowance straight across. I did a second row of stitching an 1/8 below that just to make it a little more fancy. I also used a wider stitch, on my machine it was at 3.
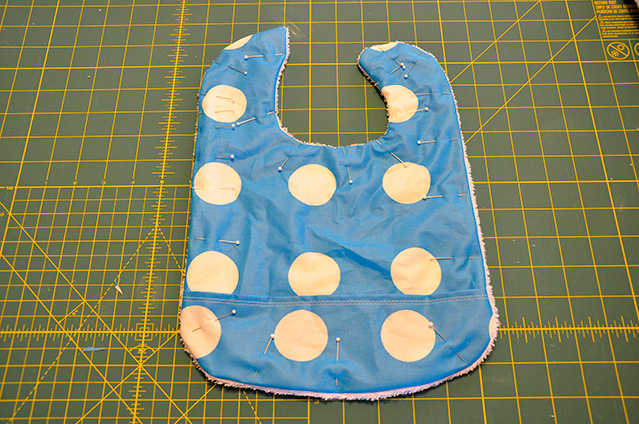
Step 4 Pin this pocket to the front of the bib portion, where the pocket is going to be at the end. Because I used a sharpie to trace the bib earlier, I was able to see where the bottom of the bib was and able to align the pocket to the bottom of the bib fairly easily. Pin in place. If you want to move the sides of the pocket (the sides, not the curved bottom part) in a little bit when you pin it makes the pocket pop out just a tiny bit which allows the food to be caught. Sew around the curved part but not the top of the pocket :)
Step 5 Lay the front of the bib onto the backing material. I used white terry cloth as that is what I had on hand. Place right sides together and pin in place.
Step 6 Sew all the way around the bib. I sewed a 3/8 inch away from my sharpie line all the way around, as when I originally traced it, I made it about 1/4 inch larger all the way around. When sewing over the pocket, follow the stitch line of where the pocket is attached. Just stitch right exactly on top of the line. Leave about a 2" hole on one of the straight sides in order to turn the bib.
Step 7 Cut off the excess fabric leaving about 1/4 inch all the way around. Cut triangles into the round section of the bib - this will make it lay flatter after turning.
Step 8 Turn the bib right side out and flatten out. Try to roll the front fabric over the back if possible so the back fabric doesn't show as much.
Step 9 Pin down and top stitch all the way around using 1/4 inch seam allowance. This will also close up the hole you made when turning.
Step 10 Install a metal snap on the ends of the neck parts. You could install two snaps so that it is adjustable or use Velcro. All will work, just a matter of preference.
And you're done! Go try it on the kiddo and see how it looks.
Worked out pretty well too, food was caught! I decided to make two cause well why not? I actually made 3 as the first one the pocket was a little too big. Happy Sewing!
Labels:
bib
Subscribe to:
Post Comments (Atom)


No comments:
Post a Comment
Hi! I love getting comments :) Please email me if you have a specific question and I'll get back to you. Thanks :)